一、概述
前面我写了关于k8s环境部署的几篇文章,k8s部署还是比较麻烦的,所以是有必要考虑一键部署的方案,这里借助ansible playbook来实现k8s环境的一键部署,实现快速部署的目的。
节点信息
| 主机名 |
IP |
角色 |
操作系统 |
| local-168-182-110 |
192.168.182.110 |
master,ansible |
centos7 |
| local-168-182-111 |
192.168.182.110 |
master |
centos7 |
| local-168-182-112 |
192.168.182.110 |
master |
centos7 |
| local-168-182-113 |
192.168.182.110 |
node |
centos7 |
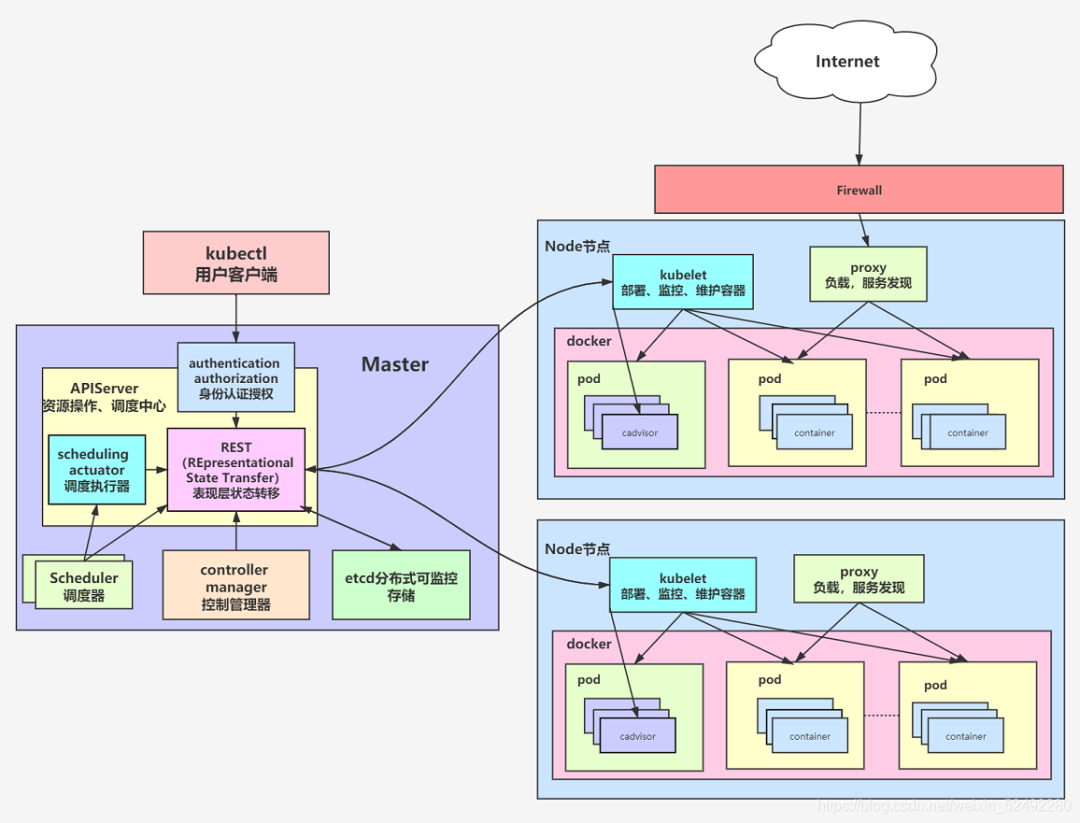
k8s 架构图:
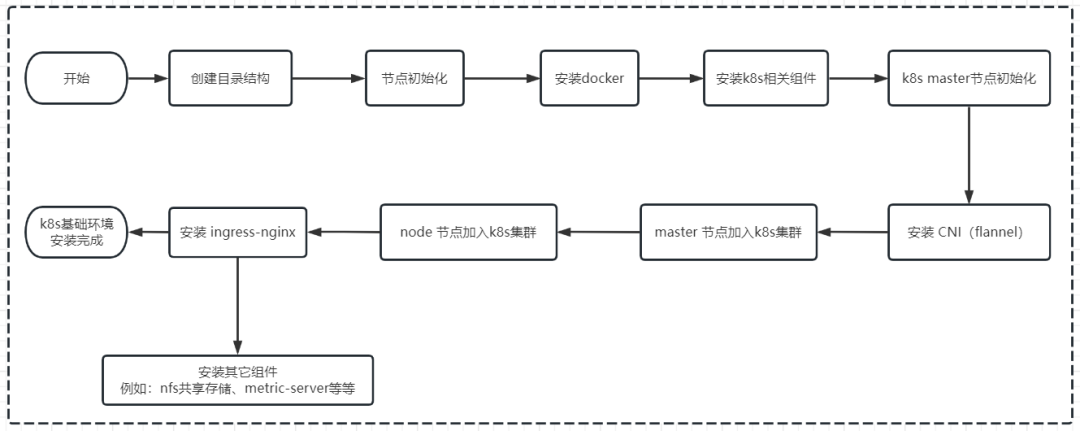
基于ansible部署k8s流程图:
二、Ansible 部署
1
2
3
| yum -y install epel-release
yum -y install ansible
ansible --version
|
1)开启记录日志
配置文件:/etc/ansible/ansible.cfg
1
2
3
| vi /etc/ansible/ansible.cfg
|
2)去掉第一次连接ssh ask确认
1
2
3
| vi /etc/ansible/ansible.cfg
|
3)配置hosts
配置文件:/etc/ansible/hosts
1
2
3
4
5
6
7
8
9
10
11
12
13
14
15
16
17
18
19
20
21
| [master1]
192.168.182.110
[master2]
192.168.182.111
192.168.182.112
[node]
192.168.182.113
[k8s:children]
master1
master2
node
[k8s:vars]
ansible_ssh_user=root
ansible_ssh_pass=1331301116
ansible_ssh_port=22
k8s_version=1.23.6
|
测试连通性

三、开始编排 ansible playbook
1)创建目录
1
| mkdir -pv ./install-k8s/{init,install-docker,install-k8s,master-init,install-cni,install-ipvs,master-join,node-join,install-ingress-nginx,install-nfs-provisioner,install-harbor,install-metrics-server,uninstall-k8s}/{files,templates,vars,tasks,handlers,meta,default}
|
2)节点初始化
- 准备
install-k8s/init/files/hosts文件
1
2
3
4
| 192.168.182.110 local-168-182-110
192.168.182.111 local-168-182-111
192.168.182.112 local-168-182-112
192.168.182.113 local-168-182-113
|
- 准备脚本
install-k8s/init/templates/init.sh,内容如下:
1
2
3
4
5
6
7
8
9
10
11
12
13
14
15
16
17
18
19
20
21
22
23
24
25
26
27
28
29
30
31
32
33
34
35
36
37
38
39
40
41
42
43
44
45
46
47
48
49
50
51
52
53
54
55
56
57
58
59
60
61
62
63
64
65
66
67
68
69
70
71
72
73
74
75
76
77
78
79
80
81
82
83
84
85
86
87
88
89
90
91
92
93
94
95
96
97
98
99
100
101
102
| #!/usr/bin/env bash
hostnamectl set-hostname $(grep `hostname -i` /tmp/hosts|awk '{print $2}')
for line in `cat /tmp/hosts`
do
sed -i "/$line/d" /etc/hosts
done
cat /tmp/hosts >> /etc/hosts
ssh-keygen -f ~/.ssh/id_rsa -P '' -q
yum -y install expect -y
for line in `cat /tmp/hosts`
do
ip=`echo $line|awk '{print $1}'`
password={{ ansible_ssh_pass }}
expect <<-EOF
spawn ssh-copy-id -i /root/.ssh/id_rsa.pub $ip
expect {
"(yes/no)?"
{
send "yes\n"
expect "*assword:" { send "$password\n"}
}
"*assword:"
{
send "$password\n"
}
}
expect eof
EOF
done
yum install chrony -y
systemctl start chronyd
systemctl enable chronyd
chronyc sources
systemctl stop firewalld
systemctl disable firewalld
swapoff -a
sed -ri 's/.*swap.*/#&/' /etc/fstab
setenforce 0
sed -i 's/^SELINUX=enforcing$/SELINUX=disabled/' /etc/selinux/config
sudo modprobe br_netfilter
lsmod | grep br_netfilter
rm -rf /etc/modules-load.d/k8s.conf
cat <<EOF | sudo tee /etc/modules-load.d/k8s.conf
overlay
br_netfilter
EOF
sudo modprobe overlay
sudo modprobe br_netfilter
rm -rf /etc/sysctl.d/k8s.conf
cat <<EOF | sudo tee /etc/sysctl.d/k8s.conf
net.bridge.bridge-nf-call-iptables = 1
net.bridge.bridge-nf-call-ip6tables = 1
net.ipv4.ip_forward = 1
EOF
sudo sysctl --system
|
- 任务编排
install-k8s/init/tasks/main.yml
1
2
3
4
5
6
| - name: cp hosts
copy: src=hosts dest=/tmp/hosts
- name: init cp
template: src=init.sh dest=/tmp/init.sh
- name: init install
shell: sh /tmp/init.sh
|
3)安装 docker
install-k8s/install-docker/files/install-docker.sh
1
2
3
4
5
6
7
8
9
10
11
12
13
14
15
16
17
18
19
20
21
22
23
24
25
26
27
28
29
30
31
32
33
34
| #!/usr/bin/env bash
cd /etc/yum.repos.d ; mkdir bak; mv CentOS-Linux-* bak/
wget -O /etc/yum.repos.d/CentOS-Base.repo http://mirrors.aliyun.com/repo/Centos-7.repo
yum -y install yum-utils
yum-config-manager --add-repo http://mirrors.aliyun.com/docker-ce/linux/centos/docker-ce.repo
yum install -y docker-ce
systemctl enable --now docker
cat >/etc/docker/daemon.json<<EOF
{
"registry-mirrors": ["http://hub-mirror.c.163.com"],
"exec-opts": ["native.cgroupdriver=systemd"]
}
EOF
systemctl restart docker
systemctl status docker containerd
|
- 任务编排
install-k8s/install-docker/tasks/main.yml
1
2
3
4
| - name: install docker cp
copy: src=install-docker.sh dest=/tmp/install-docker.sh
- name: install docker
shell: sh /tmp/install-docker.sh
|
4)安装 k8s 相关组件
install-k8s/install-k8s/templates/install-k8s.sh
1
2
3
4
5
6
7
8
9
10
11
12
13
14
15
16
17
18
19
20
21
22
23
24
25
26
27
28
29
30
31
32
33
| #!/usr/bin/env bash
yum list installed kubelet
if [ $? -eq 0 ];then
exit 0
fi
cat > /etc/yum.repos.d/kubernetes.repo << EOF
[k8s]
name=k8s
enabled=1
gpgcheck=0
baseurl=https://mirrors.aliyun.com/kubernetes/yum/repos/kubernetes-el7-x86_64/
EOF
yum install -y kubelet-{{ k8s_version }} kubeadm-{{ k8s_version }} kubectl-{{ k8s_version }} --disableexcludes=kubernetes
systemctl enable --now kubelet
systemctl status kubelet
docker pull registry.aliyuncs.com/google_containers/kube-apiserver:v{{ k8s_version }}
docker pull registry.aliyuncs.com/google_containers/kube-controller-manager:v{{ k8s_version }}
docker pull registry.aliyuncs.com/google_containers/kube-scheduler:v{{ k8s_version }}
docker pull registry.aliyuncs.com/google_containers/kube-proxy:v{{ k8s_version }}
docker pull registry.aliyuncs.com/google_containers/pause:3.6
docker pull registry.aliyuncs.com/google_containers/etcd:3.5.1-0
docker pull registry.aliyuncs.com/google_containers/coredns:v1.8.6
|
- 任务编排
install-k8s/install-k8s/tasks/main.yml
1
2
3
4
| - name: install k8s cp
template: src=install-k8s.sh dest=/tmp/install-k8s.sh
- name: install k8s
shell: sh /tmp/install-k8s.sh
|
5)k8s master节点初始化
install-k8s/master-init/templates/master-init.sh
1
2
3
4
5
6
7
8
9
10
11
12
13
14
15
16
17
18
19
20
21
22
23
| #!/usr/bin/env bash
kubectl get nodes |grep -q `hostname` 1>&2 >/dev/null
if [ $? -eq 0 ];then
exit 0
fi
ip=`hostname -i`
kubeadm init \
--apiserver-advertise-address=$ip \
--image-repository registry.aliyuncs.com/google_containers \
--kubernetes-version v{{ k8s_version }} \
--control-plane-endpoint=$ip \
--service-cidr=10.1.0.0/16 \
--pod-network-cidr=10.244.0.0/16 \
--v=5
mkdir -p $HOME/.kube
rm -rf $HOME/.kube/config
sudo cp -i /etc/kubernetes/admin.conf $HOME/.kube/config
sudo chown $(id -u):$(id -g) $HOME/.kube/config
|
- 任务编排
install-k8s/master-init/tasks/main.yml
1
2
3
4
| - name: k8s master init cp
template: src=master-init.sh dest=/tmp/master-init.sh
- name: k8s master init
shell: sh /tmp/master-init.sh
|
6)安装 CNI(flannel)
install-k8s/install-cni/files/install-flannel.sh
1
2
3
4
5
6
7
8
9
10
11
12
13
14
15
16
17
18
19
20
21
22
23
24
| #!/usr/bin/env bash
kubectl taint nodes `hostname` node-role.kubernetes.io/master:NoSchedule- 2>/dev/null
kubectl taint nodes `hostname` node.kubernetes.io/not-ready:NoSchedule- 2>/dev/null
kubectl apply -f https://raw.githubusercontent.com/flannel-io/flannel/v0.20.2/Documentation/kube-flannel.yml
kubectl get all -n kube-flannel
while true
do
kubectl get pods -n kube-flannel|grep -q '0/1'
if [ $? -ne 0 ];then
echo "flannel started"
break
else
echo "flannel starting..."
fi
sleep 1
done
|
- 任务编排
install-k8s/install-cni/tasks/main.yml
1
2
3
4
| - name: install cni flannel cp
copy: src=install-flannel.sh dest=/tmp/install-flannel.sh
- name: install cni flannel
shell: sh /tmp/install-flannel.sh
|
7)master 节点加入k8s集群
install-k8s/master-join/files/master-join.sh
1
2
3
4
5
6
7
8
9
10
11
12
13
14
15
16
17
18
19
20
21
22
23
24
25
26
27
28
29
30
| #!/usr/bin/env bash
maser_ip=`head -1 /tmp/hosts |awk '{print $1}'`
ssh $maser_ip "kubectl get nodes|grep -q `hostname`"
if [ $? -eq 0 ];then
exit 0
fi
CERT_KEY=`ssh $maser_ip "kubeadm init phase upload-certs --upload-certs|tail -1"`
join_str=`ssh $maser_ip kubeadm token create --print-join-command`
$( echo $join_str " --control-plane --certificate-key $CERT_KEY --v=5")
mkdir -p $HOME/.kube
sudo cp -i /etc/kubernetes/admin.conf $HOME/.kube/config
sudo chown $(id -u):$(id -g) $HOME/.kube/config
kubectl taint nodes `hostname` node-role.kubernetes.io/master:NoSchedule- 2>/dev/null
kubectl taint nodes `hostname` node.kubernetes.io/not-ready:NoSchedule- 2>/dev/null
|
- 任务编排
install-k8s/master-join/tasks/main.yml
1
2
3
4
| - name: master join cp
copy: src=master-join.sh dest=/tmp/master-join.sh
- name: master join
shell: sh /tmp/master-join.sh
|
8)node 节点加入k8s集群
install-k8s/node-join/files/node-join.sh
1
2
3
4
5
6
7
8
9
10
11
12
13
14
15
16
| #!/usr/bin/env bash
maser_ip=`head -1 /tmp/hosts |awk '{print $1}'`
ssh $maser_ip "kubectl get nodes|grep -q `hostname`"
if [ $? -eq 0 ];then
exit 0
fi
CERT_KEY=`ssh $maser_ip "kubeadm init phase upload-certs --upload-certs|tail -1"`
join_str=`ssh $maser_ip kubeadm token create --print-join-command`
$( echo $join_str " --certificate-key $CERT_KEY --v=5")
|
- 任务编排
install-k8s/node-join/tasks/main.yml
1
2
3
4
| - name: node join cp
copy: src=node-join.yaml dest=/tmp/node-join.yaml
- name: node join
shell: sh /tmp/node-join.yaml
|
9)安装 ingress-nginx
install-k8s/install-ingress-nginx/files/ingress-nginx.sh
1
2
3
4
5
6
7
8
9
| #!/usr/bin/env bash
docker pull registry.cn-hangzhou.aliyuncs.com/google_containers/nginx-ingress-controller:v1.2.0
docker pull registry.cn-hangzhou.aliyuncs.com/google_containers/kube-webhook-certgen:v1.1.1
kubectl apply -f /tmp/deploy.yaml
|
- 任务编排
install-k8s/install-ingress-nginx/tasks/main.yml
1
2
3
4
5
6
| - name: ingress-nginx deploy cp
copy: src=deploy.yaml dest=/tmp/deploy.yaml
- name: install ingress-nginx cp
copy: src=ingress-nginx.sh dest=/tmp/ingress-nginx.sh
- name: install ingress-nginx
shell: sh /tmp/ingress-nginx.sh
|
10)安装 nfs 共享存储
install-k8s/install-nfs-provisioner/files/nfs-provisioner.sh
1
2
3
4
5
6
7
8
9
10
11
12
13
14
15
16
17
18
19
20
21
22
23
24
25
26
27
28
29
30
31
32
33
34
35
36
37
38
39
40
41
42
43
44
45
46
47
48
49
50
51
52
53
54
55
56
57
58
59
60
61
62
63
64
65
66
67
68
69
70
71
72
73
74
75
76
| #!/usr/bin/env bash
wget https://get.helm.sh/helm-v3.7.1-linux-amd64.tar.gz -O /tmp/helm-v3.7.1-linux-amd64.tar.gz
tar -xf /tmp/helm-v3.7.1-linux-amd64.tar.gz -C /root/
rm -rf /usr/local/bin/helm
ln -s /root/linux-amd64/helm /usr/local/bin/helm
helm list -n nfs-provisioner|grep -q nfs-provisioner
if [ $? -eq 0 ];then
exit 0
fi
helm repo add nfs-subdir-external-provisioner https://kubernetes-sigs.github.io/nfs-subdir-external-provisioner/
yum -y install nfs-utils rpcbind
mkdir -p /opt/nfsdata
chmod 666 /opt/nfsdata
cat > /etc/exports<<EOF
/opt/nfsdata *(rw,no_root_squash,no_all_squash,sync)
EOF
exportfs -r
systemctl enable --now rpcbind
systemctl enable --now nfs-server
for line in `cat /tmp/hosts`
do
ip=`echo $line|awk '{print $1}'`
master_ip=`head -1 /tmp/hosts|awk '{print $1}'`
if [ "$ip" != "$master_ip" ];then
ssh $ip "yum -y install rpcbind"
ssh $ip "systemctl enable --now rpcbind"
fi
done
ip=`hostname -i`
helm install nfs-subdir-external-provisioner nfs-subdir-external-provisioner/nfs-subdir-external-provisioner \
--namespace=nfs-provisioner \
--create-namespace \
--set image.repository=willdockerhub/nfs-subdir-external-provisioner \
--set image.tag=v4.0.2 \
--set replicaCount=2 \
--set storageClass.name=nfs-client \
--set storageClass.defaultClass=true \
--set nfs.server=${ip} \
--set nfs.path=/opt/nfsdata
kubectl get pods,deploy,sc -n nfs-provisioner
while true
do
kubectl get pods -n nfs-provisioner|grep -q '0/1'
if [ $? -ne 0 ];then
echo "nfs-provisioner started"
break
else
echo "nfs-provisioner starting..."
fi
sleep 1
done
|
- 任务编排
install-k8s/install-nfs-provisioner/tasks/main.yml
1
2
3
4
| - name: install nfs-provisioner cp
copy: src=nfs-provisioner.sh dest=/tmp/nfs-provisioner.sh
- name: install nfs-provisioner
shell: sh /tmp/nfs-provisioner.sh
|
11)k8s 环境安装编排 roles
1
2
3
4
5
6
7
8
9
10
11
12
13
14
15
16
17
18
19
20
21
22
23
24
25
26
27
28
29
30
31
32
33
34
35
36
| - hosts: k8s
remote_user: root
roles:
- init
- hosts: k8s
remote_user: root
roles:
- install-docker
- hosts: k8s
remote_user: root
roles:
- install-k8s
- hosts: master1
remote_user: root
roles:
- master-init
- hosts: master1
remote_user: root
roles:
- install-cni
- hosts: master2
remote_user: root
roles:
- master-join
- hosts: node
remote_user: root
roles:
- node-join
- hosts: master1
remote_user: root
roles:
- install-ingress-nginx
- hosts: master1
remote_user: root
roles:
- install-nfs-provisioner
|
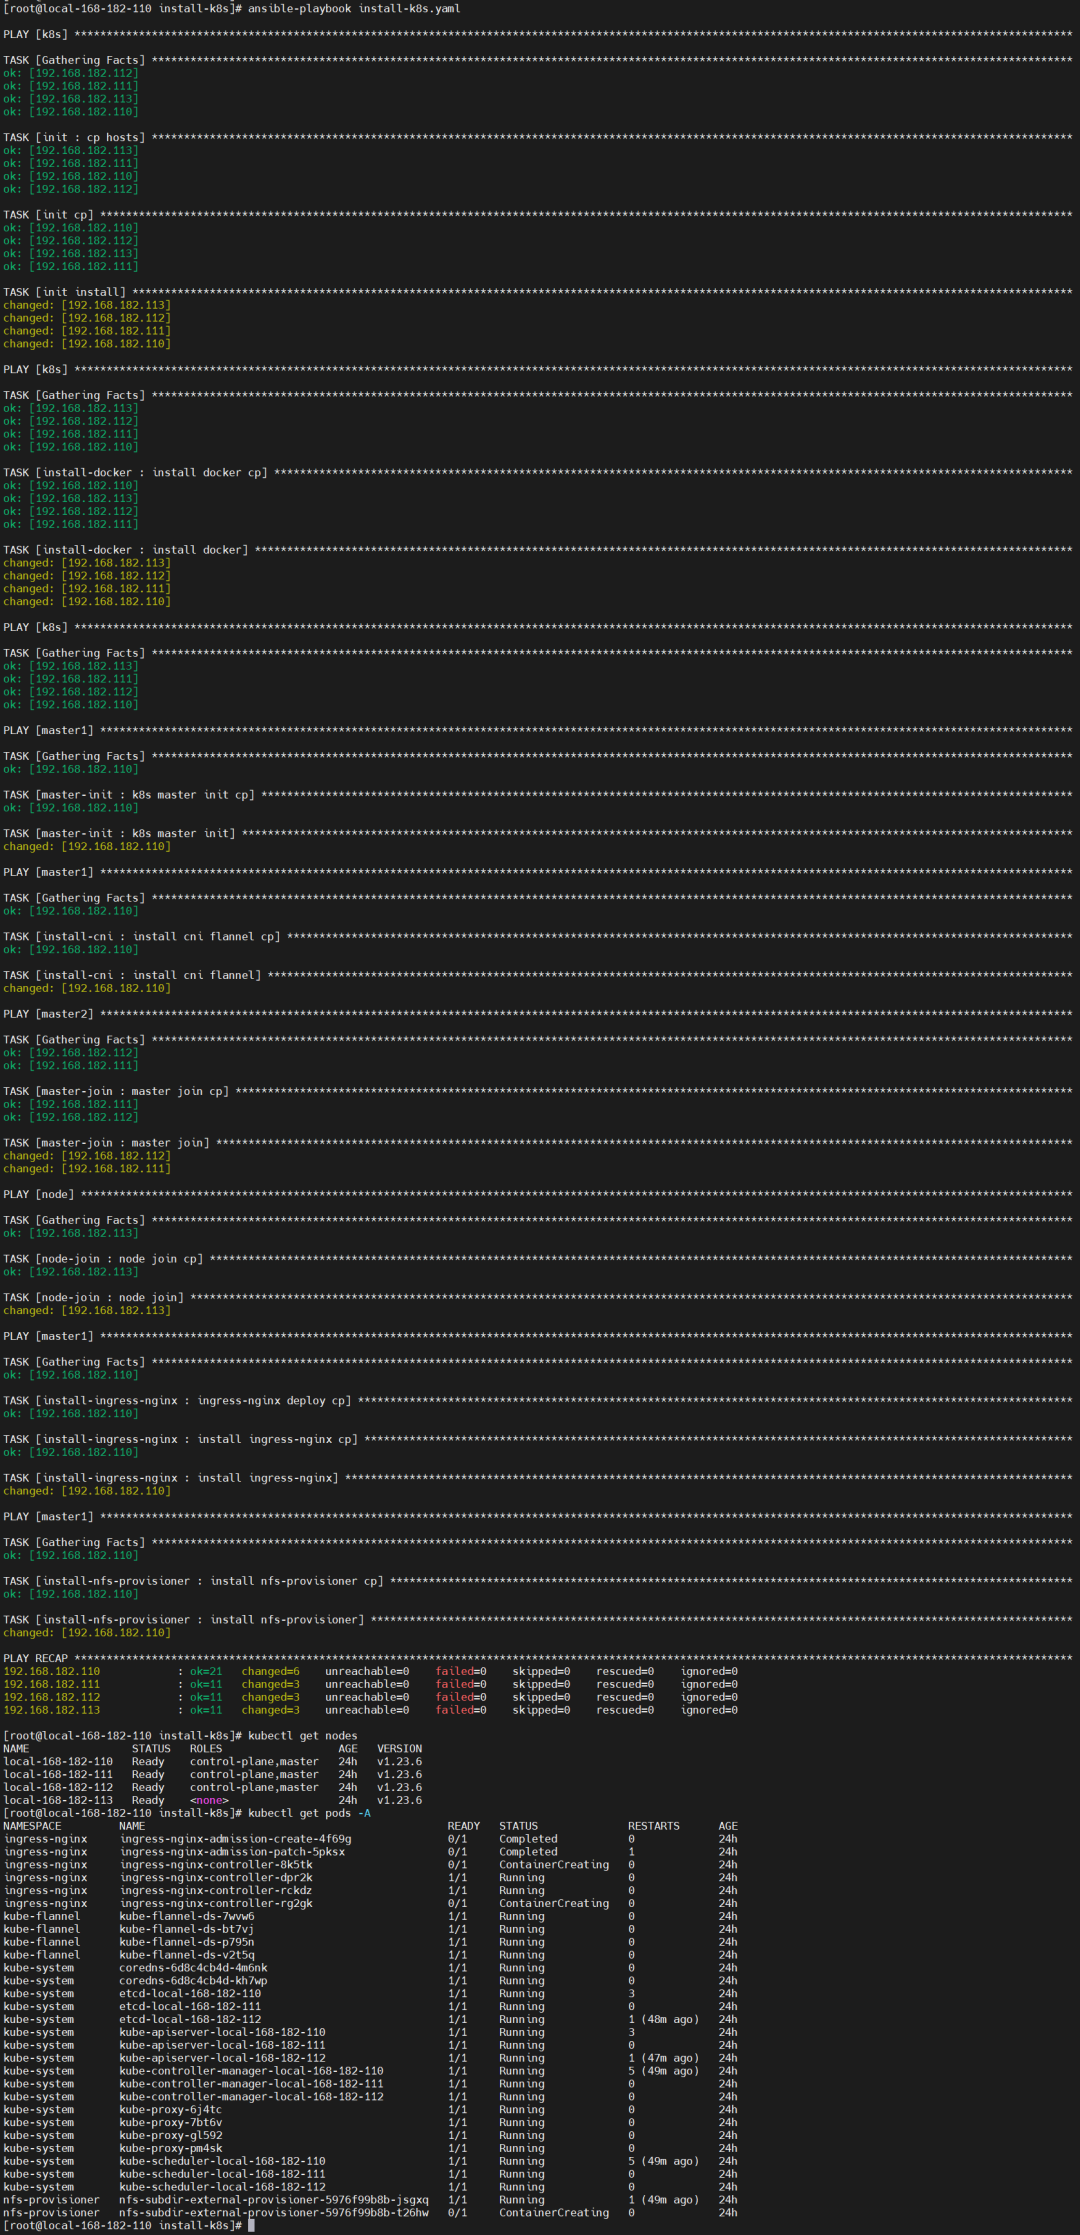
执行安装
1
2
3
4
|
ansible-playbook install-k8s.yaml
kubectl get nodes
kubectl get pods -A
|
 )
)
12)k8s 环境卸载
install-k8s/uninstall-k8s/files/uninstall-k8s.sh
1
2
3
4
5
6
7
8
9
10
11
12
13
14
| #!/usr/bin/env bash
expect <<-EOF
spawn kubeadm reset
expect "*y/N*"
send "y\n"
expect eof
EOF
rm -rf /etc/kubernetes/*
rm -fr ~/.kube
rm -fr /var/lib/etcd
|
- 任务编排
install-k8s/uninstall-k8s/tasks/main.yaml
1
2
3
4
| - name: uninstall k8s cp
copy: src=uninstall-k8s.sh dest=/tmp/uninstall-k8s.sh
- name: uninstall k8s
shell: sh /tmp/uninstall-k8s.sh
|
13)k8s 环境卸载编排 roles
1
2
3
4
| - hosts: k8s
remote_user: root
roles:
- uninstall-k8s
|
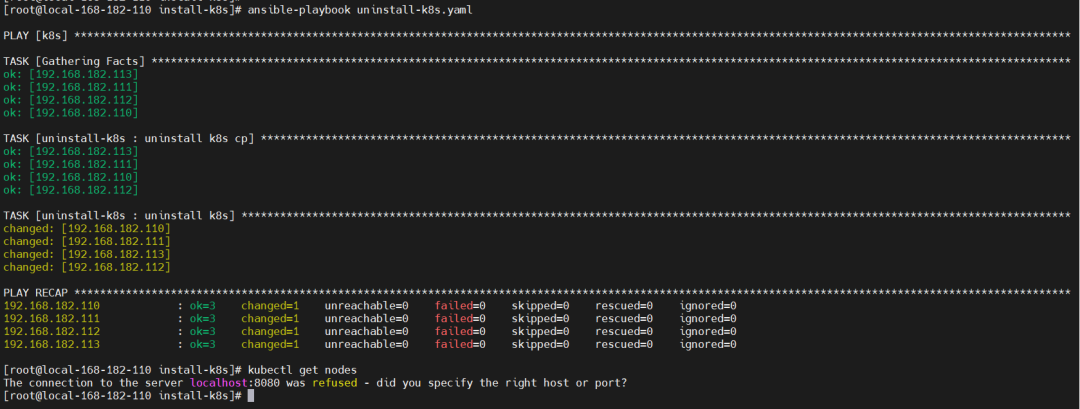
执行卸载
1
| ansible-playbook uninstall-k8s.yaml
|
温馨提示:
- 其实创建目录结构可以通过
ansible-galaxy工具,也可以通过这个工具安装在线别人编排好的包,非常方便的。
- 这里只是验证了
k8s v1.23.6版本的,其它高版本和低版本后续会继续完善验证,还有就是如果执行脚本的话,可以将copy和shell模块并用一个script模块,编排就会变更更简洁,其实script内部也是先copy文件,执行完后会清理。
k8s 一键部署(ansible)就先到这里了,后续会继续完善,增加其它组件和验证其它版本,让部署k8s环境变得更简单方便